Balance Board: DIY for Your Mind and Feet
Balance boards are not gonna necessarily make you a better surfer. They will however provide you with loads of fun and some much needed sharpening of one’s balancing skills (good for all around daily livin’ and a strong back). Balance boards can also be quite meditative when used regularly.
 I like to use mine most during: rainy/snowy/irie nights, or as a party game when the boys and girls are all carousing and havin’ a good ‘ol time to the music on the stereo.
So here’s what you’ll need:
1. – 3/4” or 1” inch plywood —preferably scrap wood as we used on this little gem
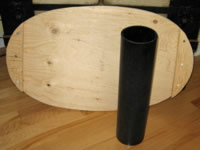
2. – 6” or 8” x 18” black PVC pipe —scrap is always best. Check in with your local plumber for some handouts.
3. – 4 1” screws
4. – Wood glue
5. – Paper and scissors for making a template
6. – Grip tape
7. – A jig saw and sand paper
8. – Two watch dogs, preferably a black one and a white one
Step One: make a template by folding your piece of paper in 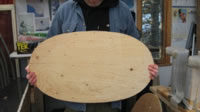 half so that it’s approximately 9” wide by 30” long. Draw a half template. The shape is up to you and won’t really make a whole hell of a difference if the width and length are close. Cut the half template, making sure to stay close to your line, open it up and voila. You have a template.
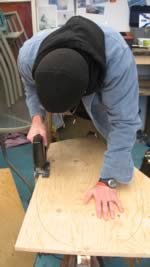
Step Two: place the template on the wood with the grain of the top side going the length of the board. Trace with a pencil and cut with the jigsaw. It’s best to cut slightly outside of the line so you can go back and sand it to its perfect outline.
Step Three: with some scraps from the ply, screw and glue a 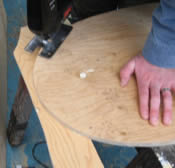 piece on one end (on the bottom of the board) making sure to get about two inches of overhang (see photo). Flip the board over so that you are looking at the top. With the saw cut the excess wood along the outline. Do this on the other side. These stoppers will allow you to stall the board and keep you from rolling off the end of the pipe. Hey, if you get good try take those off and send us a video – “No leash brah!”.
Step Four: cut the pipe so that it’s exactly as wide as the balance board. It’s best if you put a few strips of grip tape around the pipe to aid both the boards traction to the pipe and the pipes traction to the ground.
 Finally, sand the edges to avoid skinning your shins when you wipe out. Oh and you will wipe out. As for style and aesthetics, we’ll leave that up to your own creativity. The board is a blank canvas and you can draw or paint whatever the hell you want on it.
This particular model cost my friend Tim and I one Canadian six pack and about two hours of a flat day fun.
*special thanks to Guinness, Peta, and Tim – aka Black Spidey.
